
Winter is a time for activities such as koji making.
Koji is the fungus Aspergillus oryzae grown on a grain substrate. It is rich in enzymes used for breaking down soybeans in the production of various kinds of miso and soy sauce. It is also key in saké production.
It takes three days to make each batch. I will go through the process of koji making step by step.
Here’s what you need:
– a heat cabinet
– steam cooker
– cloths for the steamer
– mold growing containers
– pots and pans and strainers etc.

The ingredients:
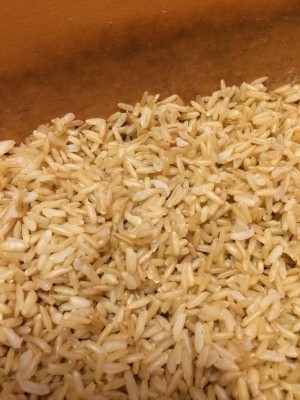
– rice
– tane koji

I use ecologically grown short grain rice that has been polished. Polishing to a certain degree makes it possible for the mold to penetrate and grow into the kernel of the rice. Tane koji is the starter for the mold which I order from Japan. This is a powder – a collection of living spores of the mold Aspergillus oryzae. The spores last a long time (I have had good tane koji remain viable for more than 30 years), and germinate when the conditions of humidity and warmth become right.
Other kinds of rice or grains can be used, but white rice is the easiest and therefore best to start with. After making koji a number of times, one gains a feel for the right smells, taste, color, humidity and dryness that is necessary for the best quality koji. Then you can go wild experimenting with different grains or other types of substrate.
Step one
The first step is to rinse and soak the rice (here 800 grams) for about 8 hours. In the meantime rinse and clean the equipment from the dust that has accumulated since the last koji making. Sometimes I have had to boil things that have become contaminated with other microorganisms.

Step two
After soaking the rice for a number of hours it is time to take the next step.
First boil the steaming cloths for a few minutes in order to sterilize them.

Put a gauze cloth in the bottom of the steamer and then half of the rice.

Package nicely.

Put over boiling water and steam cook for 20 minutes.

Put the other half of the rice in the second steamer and steam cook after the first is done. I could steam them together but they turn out better when each is done separately.
After steaming let the two portions cool.
Put the steamed rice into a mixing bowl, one portion at a time.

Sprinkle an extremely small amount of tane koji powder and mix it in thoroughly.

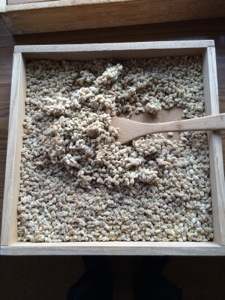
Put into a terracotta form and cover with the damp steamer cloth. For rice koji I have found that the terracotta form works best for retaining a just right balance of humidity and aeration. For barley koji I use wooden trays.

Put the forms in the heat cabinet set at 30 degrees centigrade, testing occasionally with a thermometer.

After 12 hours we will open the cabinet and aerate the rice.
Step 3
The morning of the second day
Open the incubator, check the temperature and adjust if necessary. Take out the two containers and mix in air by scraping the rice mass back and forth at least three times.

Break up any clumps that form and get a feel for the dry/wetness of the rice. If it clumps or cakes together, it’s too wet and will have to be aerated more and more often. If too dry, a sprinkling of water while aerating will help.
After aerating, put the dampened cloth lid back on and put back into the incubator, alternating between the top and bottom shelves. Leave to grow.
Next step after about 12 hours.
Step 4
The evening of the second day
Follow the same procedure as 12 hours ago – check temperature, mix air in and observe the conditions of growth. So far there is no difference in what the rice looks like, so no new picture (it would look like the one from this morning). The humidity seems right and there is no clumping. There is a slight change in odor indicating lactic acid fermentation in the rice which is OK.
Next step in another 12 hours.
Step 5
The morning of the third day
Again we do the same as the last 2 steps. Aeration is very important. Everything is developing quite nicely.

We can now see traces of the mold growing. The humidity is just right, and the odor is developing into the sweet, flowery, fruity bouquet characteristic of the Aspergillus oryzae growing on rice.
We’ll have a look after another 12 hours this evening.
Step 6
Now is the evening of the third day
The mold has been growing in the heat cabinet for 2 days at about 27 degrees centigrade. The rice now has a furry covering of aspergillus mold which cakes the whole mass together. The dampness, odor and taste are perfect.

The mold has not blossomed yet but is just starting to. The fuzz of the mycelia is beautiful, and the odor and flavor are wonderful. The enzyme level should be at its very best now, so it is time to harvest.

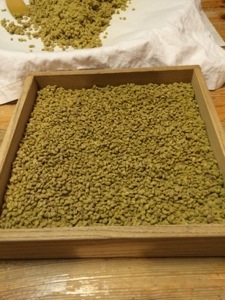
On flowering it will turn a nice yellow-tan color. Many koji makers let it grow until it gets that color, and perhaps this adds to the flavor and color of the miso, but I seldom let it go that far and haven’t noticed any difference in the miso.
Scrape the mass onto cloth lined drying baskets and spread it out.

These baskets go on a rack in the furnace room to dry for 2 or 3 days.
The next and last step will occur in about 2 days when I check for dryness, package and save for later miso making.
Now is the time to put rice to soak for the next batch. I will make up to ten batches of rice and barley koji during this winter season.
Step 7
The evening of the fifth day
It is time to package the koji that has been drying for two days. In plastic bags it will keep for years in the coolness of the food storage room in the cellar. I will probably use it up within a half a year.

The 800 grams of rice has now become 700 grams of rice koji full of enzymes – amylase which catalyses the breakdown of starch into sugars, lipase which facilitates the breakdown of fats and protease for the breakdown of proteins – perfect for making soybeans more palatable as in miso and soy sauce fermentation.
This 700 grams of koji will make as much as 3 kilos of miso. It can also be used to make amazaké rice pudding and saké rice wine.
And that brings us to the end of one koji making cycle.
In the meantime, the next batch of rice koji has been growing these last two days and is ready for harvest. And the third batch will now be put to soak. This succession of procedures will continue for the next few weeks.
I have a bigger heat cabinet and could make one big batch all at once, but I prefer the slow steady pace of making a series of small batches over a longer period of time.
Brown rice koji
Making brown rice koji is much more difficult than polished rice koji. More often than not I have failed. I thought I should try again when I noticed a bag of ecologically grown brown rice that looked like it might work (Italian, long grain). I washed and soaked 750 grams, which is less than usual but easier to manage. I then broke up and inoculated the rice with the same tane koji I use for the other rice cultures.
I put it into the terracotta trays.

Then into the heat chamber as usual.
After the first day growing, the smell seemed ‘off’ – as if a bacteria growth was going to take over and cause a bad culture that would have to be thrown out on the compost like many times before. With extra aeration and spreading out, the mold took hold again, and it turned out fine.
After two and a half days growing.

Spread out to dry.

Brown rice has a covering that is polished off when making white rice. This barrier hinders the koji mold from growing into the kernel. The trick is to soak and steam the rice just enough, so as to break this shell. That way the mold can get in. At the same time one must not let the rice get too soggy where bacteria thrive. Another method is to find a rice that is slightly polished but can still be considered brown rice. A little rice polishing machine would be good to have. I could polish it just right and throw in the polishings.
Brown rice koji making is for the experienced koji maker and whole foods enthusiast. It is more difficult to keep the mold growing ahead of the bacteria. It is also less efficient in enzyme production because the mold doesn’t get into all the grains.
So, I recommend starting out koji making with white or polished rice, which is by far the easiest, while learning the procedure, the look, the smells, the consistencies, etc. Then move on to experiment with brown rice and other grains.
Barley koji
The procedur for making barley koji follows the same general flow as for making rice koji, but there are some differences.
Use pearled barley that is well hulled and slightly polished so that the mold can grow into the kernel.

Steam each portion of soaked barley 30 minutes instead of 20 as for the rice.
Use tane koji that is made for barley koji. I’m sure the tane koji for rice will work too, but is not optimal.
I use wooden trays for growing the mold rather than the ceramic ones used for rice koji. The barley needs to be spread out more in order to not get soggy.

Barley koji ripens and sporulates sooner – the middle of the second day.
I let it grow until 48 hours have passed before harvesting it. Harvesting can raise quite a cloud of spores, so be careful.
Otherwise follow the same instructions given for making rice koji.
Tane koji
I have previously bought tane koji (koji starter) from suppliers in Japan, but this last time I bought a package (along with starter for barley koji and tempeh) from a company in Lakewood Washington USA that I found on internet. It is so easy to find and contact these companies using internet now days.

If you have any questions, suggestions or otherwise, please feel free to contact us at:
By the way, we are a planning a three week trip to Japan in April. We hope to visit some small-scale ecological gardens and traditional food production outfits. If anyone out there has any tips on places to visit, let us know!

How can i make it without the temperature controlled heating cabinet? Are there any thrifty solutions? Also, can i make it in clay pots instead of terracotta?
Yes, I often recommend a box with a lamp and a thermometer. Check the temperature often, Then turn the lamp on or off to keep the temperatur near 30 degrees plus or minus 5. A clay pot should work if it’s not glazed.
Good Luck
Timo
Hi, could you please comment how you store your tane koji, so that it remains viable for long? Desiccant? Like other vendors, Higuchi recommends 15-25C and not to put it into a freezer or refrigerator to avoid condensation. I would like to buy from them, but a 30g package would last me for years and it would be a waste to throw it away after 1 vor 2 years.
By the way smaller quantities are available from Austria (www.fermentationculture.eu) but I personally prefer buying directly from the manufacturer.
Hi
Good article.
If you please I have a few questions, and i hope answer them.
1-Is koji rice the same thing as Malt rice? If isn’t: can you tell me what the malt rice is and how we can make it?
2-Does miso contain alcohol?
Thank you!
1 I’m not sure what malt rice is, but I assume it’s sprouted/germinated unhusked rice that would be used to make alcoholic beverages like beer. Ive never done this, but look for a recipe for making malted barley and use that. It may be difficult to find unhusked rice.
2. Miso does develop a small amout of alcohol because yeast grows in the koji and comes from the air etc when making miso.
Community.Runanempire.Com
How to make Koji | timogarden
Hi.Ive summarised a Koji method..could anyone tell me if this is correct, please?
Koji/Kome-koji/rice koji= fresh/fermented grains or rice upto 48hrs then fridge 12 hrs to halt fermentation. Pack and possibly keep in fridge further couple days
Tane-koji/spored whole grains or strained powder = Kome-koji fermented further 36hrs, with no refrigeration process, (total 84hrs) + two days drying, to create Tani-koji grains/spores powder
Hi im looking at doing this Koji and have been compiling a doc for my own reference, from many sources etc. Could the author or anyone in the know have a quick read and se if ive got it correct please. Would be appreciated as im getting confused with the terms etc
thx. Ive posted it on my blog here:
https://blackdogonfood.net/blog/koji/
Hi Timo,
I’d just like to thank you for your detailed and accurate instructions on making Koji.
I am about to finish my first batch and it’s doing very well, smells great and looks stunning, nicely fluffy with the mould.
I didn’t have any terracotta trays, so I have used a couple of pyrex dishes, it’s worked fine with them.
I incubated in a modified polystyrene box with lid (it’s quite large).
I usually use this in the winter for my sour dough bread.
The modifications are a light globe in the bottom with a variable control for the current (hence – temperature) and a hole in the lid where the thermometer fits firmly.
Thanks once again,
Cheers,
Jim
Thank you! Your experience is very interesting, esp about pyrex dishes.
I have just bought a starter pack of Aspergillus from Japan. All the articles I can find suggest 30 C as the best temperature. However, when I translate the instructions, they are 37 – 39 C. Any ideas why the difference. The packet is labelled “Reformed long white fungus small pouch powder” when translated
Strange, I always hear 30 too. However, I have had the electricity or thermostat go off and have been able to grow good koji at around 20 degrees but took an extra 24 hours. 37 to 39 won’t kill it, so should work, but probably take less time.
Good luck
Never mind, you answered the question previously. Gem-cultures instructions lead you to believe that the the barley should be white when completed, “each barley grain should be cottony white. There may be some areas where light yellow-green spores have begun to form will cause no harm.” You have let yours go to complete sporification. I’ll do more research but mine was mostly yellow green when it used it for miso paste prep. It’s confusing that there are two entirely and contrasting instructions out there.
Hmmm, I haven’t read those instructions. I let the growing go 48 hrs and get green sporulation. It makes a darker miso I believe. Rice starter is bred for a lighter koji and miso.
Hi!
I am so glad I found this page.
I am koji-making beginner and have failed 5 times by now, and was hoping you had some good advises for me. I use grötris, let is soak for 10-12 hours, drain it and then steam it (ångkoka). Still after 40-60 minutes, it’s still pretty hard, not sticking togather similar to how preboild rice would be like. I was surprised to read you only steam 20 minutes!
Things go well until I see white spots on the rice but then it stops. Rice feels even more dried out by then so I even spray with water. Some rice grains does not get the while mold, some get some. Say in average 50%. Never “fluffy”. Smells good, even have some heat. After 3-4 days. Nothing more happens.
I somehow believe it so dry so the mold can not get into the rice. I tried broken jasmine rice for a change and then everything got too soft, Turned streight into amazake instead of koji.
I understand this is not much information but maybe you still have some immediate advise to give me? Thanks!
Hello
This subject puzzled me and I needed accurate information.
I got koji-kin through the internet. Can koji-kin be used as a koji starter? and is it okay to use the koji that I made at home to make rice wine?
2. What is the correct way to make wine using koji? For example, if I want to make wine using 2 kg of rice, what is the proper amount of koji?
3. Should the Koji be grinded before use?
4 – Is the koji that produced by white rice only work in white rice or working in all kinds of rice?
I think the questions are many and I apologize if it was a nuisance but I read your article and I like it and I think you can help me
thank you very much
Hi Timo
Great instruction and very helpful info here :)
I just made my first batch of barley koji and i think it turned out great with intense fruity and meaty ,but I’m not sure with the texture though.Is it normal for barley koji to be very very compact and cake-like(appearance pretty much like tempeh).Not dry and can’t easily separate like rice koji.
i soaked mine overnight ,then steamed for 15minute. Aerate at 24hr mark after inoculated with spores ,then harvest at 48hr mark.
Hello,
It sounds good. The koji does get compact the second day. I mix and aerate every 12 hours, but yours is undoubtedly sufficiantly aerated too.
Hi!
I’m on my second attempt at koji (first failed) but I’m not so sure how good my starter is.
Do you have a link to your normal supplier?
Thanks,
Jon
Here are the two that I buy from.
Koji Starter, etc – http://www.gemcultures.com
Higuchi Shoten – http://www.higuchi-m.co.jp
Good luck!
Thank you for this important information
I have 2 question and I hope to answer it
1- what is the koji starter and can we replace it by another yeast like Chinese yeast ball or not?
2- If we make koji at home just like you did …
Can we use this koji to make wine or rice vinegar at home
Thank you
Hello,
Koji starter is mold spores, while yeast balls are yeast. You cannot use the yeast balls for making koji. You can use koji to make rice wine or rice vinegar, but you may need to add yeast or vinegar starter later in the process.
Good luck!
Timo
[…] via How to make Koji […]
I used haiga mai rice and it was perfect! I only made a small amount to start with and now keep adding more rice as I go. I have a very warm kitchen so the Aspergillus takes over quickly. In 12 hours, I have new mold growing. Very fun to watch, very tasty and fragrant. I marinated a whole red snapper in it, making sure plenty got into the body cavity. I almost ate the entire fish by myself! Also great for pickles and I added some to organic soybean (which I soaked for 3 days), let lactoferment with salt, blended until smooth, and drained. After, I cooked the soybeans, let cool and added the koji. I saved the liquid from the soybean ferment. My soybeans look like they’re heading in the right direction to become miso. Color changes every day and it almost smells like miso already. Lots of fun but requires patience.
Thank you very much for telling us about your interesting experiences with koji!
What is haiga mai rice? And we would like to know more about the red snapper (I assume that’s the fish) dish – was it raw? – no salt? Keep up the good work.
Tim,
Thank you so much for all the information and your time and effort here. I especially thank you for mentioning the company in WA for the starters. I live in WA and didn’t know it. I prefer to buy from a specialized small business like GEM than Amazon which also in in my neighborhood in Seattle.
Wonderful insight and informative conversations in your posts!! It seems like you and I have similar interests in many things.
I agree that Winter is for fermentation. I make Korean miso from scratch, meaning made from 100% soy beans. Instead of adding any spores I use rice straw during drying/fermentation process and therefore the process is wild fermentation. It has much more complex flavor and each batch tastes different. It takes more understanding to make a good one. This is done during Winter when my wood burning stove can run most of the days for several days and put into salt water in early Spring to get ready for warmer temperature.
I am so happy to run into people who who also has interest in working with microbes. After all, our bodies are also run by microbes. It is good to know them.
Thank you,
Yes it’s cool that Gem is in WA.
And thank you for info on Korean miso too. Very interesting. I’d like to learn more. Please come by if you are over this way. Sweden I mean.
Haiga mai is semi-polished rice. It looks, tastes and cooks pretty much like normal polished white rice, but supposedly includes the germ and is more nutritious. I’ve never seen it outside of Japan but then again I haven’t really looked for it either.
Thank you for taking the time to share this information. I am just starting to make my first batch of koji. How long does it take to dry the koji rice once you have finished making it?
I dry it for 2 days over the warm water pipes in our basement.
Great post, thank you! What about the polished rice – did you polish it yourself, and how was that done? Or is polished short-grain eko rice available in the Sthlm area?
Thank you,
Ion
I don’t polish rice myself. It’s available in many food stores in sweden called gröt ris. I buy it at gröna tanten in uppsala.
hello tim! great post!
by the way i would like to see if the growth of A. Oryzae specifically with a uncontrolled environment with a usual room temp of 29~35 C and a humidity of 79 to 88% is very much possible? we’re actually located close to a corn farm and frequent mold growth really occurs usually food left laying around like at least a day or two to three days and you’l notice it with a distinct smell at first, just not sure if its the safe one although no one ever had any health problems at all.
Well, you are brave. But that’s the way it all started. Out of hunger or experiment curiosity people ate moldy food and most survived, some got sick and a few died. Some may even have liked it and comtinued to make and eat it as with tempeh and koji. I would suggest you do it in winter when the ambient temperature is lower and have it tested before eating it. The native molds in the environment are different in asia then in the west. I will stick to the lab produced starters. Good luck.
Awesome post here!
I just recently started experimenting with koji. I have noticed brownish-orange blotches in my trays of inoculated rice. Have you ever had any experiences like this? I have pictures and would be greatly appreciative if you had any insight to shed.
Hmm, haven’t had brown orange mold that I can remember. Probably best to throw it out, clean everything and start over.
My sister in law said you got it. Only throw away any black mold.
Hi, thanks for the great blog. Could you tell me where to find tane koji in Tokyo? I was just there and found shio koji packs in a lot of supermarkets but couldnt locate any koji kin.
I’m sorry, but only know of one in Osaka. But there should be a few in Tokyo or Yokohama. Ask around.
Hi Timo,
just a quick question – how do you keep your terracotta forms clean & sterilized?
I tried it myself here, but ran into a bit of a problem:
They won’t fit in any of my cooking pots & I definitely don’t want to use bleach or something like that.
Thanks in advance
Lars
Well, I don’t! I wash the terrcotta forms before using to get the dust off, then use them about six times without washing in between. The koji mold seems to maintain a stasis, but after a while the bacteria gradually get established, and altho not dangerous, cause the quality of the koji growth to get worse. I then wash/scrub them again, then make more batches or put them away until the next koji season. I have occasionaly boiled them in a very large pan or baked them in the oven, but haven’t found this entirely neccessary.
Good luck!
I’m interested in doing koji this summer and i will probably buy the starter kit from GEMcultures, is there any risk in doing koji ? can i inadvertently create something toxic during the procedure ?
I suppose it’s possible to do that, but very unlikely, and I’m sure you would notice. It’s good to try and learn.
Regarding the Koji Rice Pudding question, you can koji ANY rice you’d like to flavor your rice pudding. “Usually”, a glutinous rice is preferred as it will get creamier but IF, all you have is jasmine or long grain it’ll work fine. We’ve even used purple “forbidden rice” to culture cream for koji butter and for a desert burrata. Best of luck, check out some of our other koji projects @ https://www.instagram.com/_broken_mold/
Yes thanks, any rice will do. Even other grains or starchy foods.
Vad är det för skåp du använder?
Hej, it’s a lunch box warmer I found thrown away in a container about 40 yeaes ago in Stockholm. I later bought a large stainless steel ‘box’ for rolling out food to patients at a hospital. Otherwise a large cardboard box with low energy lamp, thermometer and on/off switch will work with good survalence. Good luck!
Hey how’s things does anyone know if you can grow
Koji on pudding rice. I want to make a koji rice pudding dish. Thanks
I’m not sure what you mean by pudding rice. The rice I use for making koji is called oudding rice in sweden. Or if you mean mixing koji and rice pudding and making amasake then yes – just boil pudding rice without salt, let cool a bit, add koji and keep at 50 to 60 degrees C for about 8 hours. Very sweet and tasty.
[…] variety), though it too doesn’t take too much effort to make if you’ve got koji spores on hand, and the dried koji lasts a long time if stored properly. I love miso and use it in a lot […]
Thank you so much for all the guidance in making my first batch of koji using white sushi rice! I went just a little long and developed some yellow fuzz and some green fuzz. Would you suggest scraping this off or just mixing it in with the dried koji and proceeding as normal? Thanks again!
That’s fine I’m sure! Proceed as normal.
Hello just wondering what temp you dry the koji inoculated rice at?? Thanks!
I don’t know. I just soread it out on a cloth lined basket and put it in a warm place, like over warm water pipes, a radiator or on top of the refrigerator.
Hi, You don’t happen to know what type of wood the carpenters used in your koji buta do you? I have seen a norwegian sake firm had some made out aspen wood but wondered what yours might be made from assuming they aren’t cedar :) Tack så mycket!
Yes, it was ash (ask).
Cong Wen, I got them from Meidi-ya in Singapore (http://www.meidi-ya.com.sg/en/). I also bought natto and many other good Japanese goods there.
I also read many japanese blogs where the japanese use koji rice instead of koji-kin to make more koji. It’s better to use koji-kin but if you’ll use koji rice you can use just a little like 2 table spoons to inoculate 6 cups of rice.
Good luck finding it!
Good info!
J ohn
Have you successfully used Koji Rice in place of the Koji Kin?
Has anyone within this blog?
No, I never have but have had many questions about it. I think it must be the way people made koji in the past, so it must be posible, but I recomend using tane koji from a reputable company.
Hiya! Thanks so much for your great instructions! My koji rice goes straight from a white fuzz to a blackish fuzz… is this ok for eating/using further still?
Thank you!
Strange, mine never goes black, but more greenish grey. May not be good to eat. Harvest when white fuzz. Good luck.
Hello I am trying to make koji rice with commercial koji rice. Is this possible. Shipping Koji to my country requires international shipping and it’s very expensive but I did got a brown rice koji grains.
I’m not sure what you mean by ‘commercial koji rice. It should be possible to make new koji from old koji, but you should have some knowlege of microbiological methods so that you don’t get the new koji contaminated with organisms that will taint the miso. Ordering and shiping the small packages of tane koji (koji starter) doesn’t cost very much at all. I recommend using good tane koji.
Good luck
Hi when I mean commercial koji rice I mean cold mountain koji. Actually I did made some koji from cold mountain koji rice just by mixing them together. 1:5 cold (mountain koji rice:white rice). I bought it when I was travelling in Singapore.
I’ve had success with this and still dying it.
What do you mean with “knowlege of microbiological methods” btw.
That was a very good method of increasing your amount of koji. You can do that many times, but you are likely to gradually get more and more other molds, bacteria and yeast into the mixture. I mean sterile laboratory conditions for increasing koji or koji starter (tane koji), so that the koji is pure. Making koji under kitchen conditions with lab produced starter is good enough.
Oh, I see I did not considered that. I’ll try to buy some from Gem Cultures, inc.
For the mean time I am making some sake and amazake from the new rice koji. And it’s really working nicely.
Great!
John. I am curious to make koji rice from brown rice koji I just got at my local co-op. You mentioned you mixed koji rice with uncultured rice at a 1:5 ratio. It seems like that turned out well for you. I have a couple questions. Was the koji rice dried or fresh? Did you have to leave it out to sporulate before you added it to the fresh rice you were inoculating? Can I just steam rice and add my koji rice to the fresh rice and incubate it? Everything I know about cultures tells me this should work. I have much more experience with bacteria ferments and am just getting into molds.
Thanks!
Colin
colin.franger@gmail.com
Hello, I don’t use brown rice koji to inoculate or make rice koji. I use tane koji (koji starter) for rice to make rice koji. It is dry and I buy it from Gem Cultures. I steam cook the rice and add tane koji when it’s cooled down.
Good luck!
You may be referring to a comment I made to a question. I don’t use this method, so I don’t have any experience. I was just speculating. But it should work for a while. Let it sporulate, dry or fresh doesn’t matter, just add to steamed, but cooled rice.
Hi John, may I know where in Singapore did you get cold mountain koji?
Hi, thanks for the tutorial, I kind of followed your instructions, half followed the instructions on the package from GEM cultures. I had two issues, but I’m unsure if they’re problems or not. 1 was that on the 1st morning I awoke to find the temperature around 40deg, and the smell wasn’t exactly pleasant but it wasn’t horrible. I adjusted my temperatures and it never went above 35 again, but I’m unsure how long it was at 40. So I’ve had none of what people describe as this amazing smell, but the rice visually looks 100%, its covered in that white coating, and now has almost no smell to it, good or bad. Moisture content seems pretty perfect too, and if I crack open a grain its about half white chalk. All seems good apart from no delicious smell. How do I know if its worked? Thanks!
Sounds like it’s OK as long as it doesn’t smell bad. Dry it and make a new batch until you get it right. Make miso with the different kojis, label them well and test the flavour after a year or two.
Good luck!
I love making rice koji, bean koji and barley koji. I have even innoculated fresh coconut with koji spores, then add steamed rice in a few hours and let the process complete, makes outstanding coconut amazake and coconut bread.
You can buy amazing handmade koji making trays (no nails or with nails) from Eric Edgin from Bloomington, Indiana. He is on Etsy as DecadenceByHand. He also makes muro, the heat cabinet; he supplies a controller box, you supply the heat source and humidifier. A ceramic heater and sonic-type diffuser are usually what he recommends. He delivers and sets up from Indiana to Michigan for very reasonable fee. He is considering driving further South and to East/West Coast should he accumulate enough orders. He is a talented woodcrafter, expanding into coopering and plank style miso buckets are coming soon. He also knows others in the industry, so if he cannot help you he can often point you elsewhere. He participates in a Facebook group ‘The Art of Miso’—we make much more than miso, plenty of recipes and methods shared, and we often do group events ‘let’s make ____’—plenty of advance warning so you can prepare, on 5/24 we kick off a group focus on making grain koji, you pick your grain. Of course as soon as event was announced some chose to go ahead and make some rather than wait for actual date. The participants try to share photos of what we are making during these fun group events, so you get a view of what their batch looked like at that point in the process. We help each other with troubleshooting,etc. Last month we made tempeh. A year ago it was mirin.
Update, visit DecadenceByHand.com for Eric Edgin’s koji trays, as he moved off Etsy.
OK, Thanks!
Wow! Thanks for the great info and tips.
I don’t understand Swedish but I think this is the company. Looks like the have quite a few things that could be used for making koji/tane koji. We are in New York in the US so getting wooden shelves made is not so difficult. There is also someone in Michigan named Eric that makes his livelihood by teaching charcuterie/salami making, etc. and making koji muros as well as the sheets. From the links below it looks like I could get a really nice heating cabinet/proofer/incubator for less than 20kr. Is that possible? But you’ve given me some great ideas on where to find what we used to call bread warmers in which we could easily control both temperature and humidity for a very long time (from Friday morning to Monday morning when the bakers returned). Thanks!
http://www.elektrotermo.se
http://elektrotermo.se/sortiment.php?levelId=12_160&showArt=12_160
http://elektrotermo.se/sortiment.php?levelId=7&showArt=7&showAll=7
Yes! Good news! It is the company, but the prices of what you are looking at are in the range of 3500 to 6000 dollars. I always look for used or make my own. You can probably find used ones there in NY at a store with used restaurant and bakery equipment. Bread warmers would most likely work great.
Thank you!
Great description. Would you describe the heat cabinet? Brand, size, possible cost, cheaper alternatives to this model? Also, where did your wooden trays come from? THANKS!
I found mine in a dumpster on the street in Stockholm. It’s from Elektro Thermo AB, but I’m sure the company doesn’t exist any more. These cabinets used to be found in every lunch room so that employees could warm their lunch boxes. Now it’s microwaves. You could look for something similar at recycling places or lab supply companies. Or make one with a cardboard box, low power lamp, and a thermometer which you check often to see when to turn the lamp off and on. The trays were made to my specifications at a local carpentry shop. I can send more details if you need.
Thanks for the very detailed instructions. I’m at hour 53 and it smells good to me but isn’t changed visually at all. It got too hot (120 F) after 20 hours. I had checked it before sleep 7 hours prior, so I don’t know how long it had been that hot. was the mold dead at that point? It’s continuing to generate its own heat, but i suppose bacteria would do that too. Since it still smells good, is it possibly still useful/edible?
I’ve been in a bit of a tizzy and should have answered earlier. Anyway it is hard to tell what you should do. If it looks and smells good like it usually does and dries easily then it’s probably OK to use. If it gets soggy and is hard to dry then bacteria have probably taken over and it should be thrown out. A lot of experience is the the best guide, so keep at it.
Good Luck, Timo
Thanks for sharing your thoughts! It was still alive! It turns out i had been smothering it unknowingly in an effort to keep the humidity high. As soon as I gave it more access to air, it started growing. It kept overheating too, even once I removed all additional heat sources and insulation. This mold is more resilient to heat than advertised (rising to 110 F repeatedly)(and I’m making a test batch of amazake and see that the enzymes are too). Between the slow start and the reduced humidity, it grew really slowly. Over 5 days from inoculation to the first signs of spore development. I need to construct a better incubator…
Thanks for the info on later developments – interesting and it sounds good. I never let the rice koji go to sporulation, but harvest after 48 hours no matter what. Barley koji on the other hand sporulates very quickly and that’s fine too. My theory is that rice koji spoliation has been bred to come later because for rice miso a lighter color is desirable, but the other way around for barley miso.
timo
Good day, Where can I purchase tane koji?
Thank you
Hello, there are pobably many suppliers, but I know of one – Gem Cultures. If you go to my link page under Menu there is a link.
Good luck!
organic farming vs conventional farming
How to make Koji | timogarden
Solars Panels Companies
How to make Koji | timogarden
Great post! I’ve started getting into fermenting my own food now and this looks interesting. I wonder if I can find Koji in Australia.
I don’t know at all about Australia. It looks like you travel to Japan. It’s easiest to get koji and tane koji there. We are going to Japan in April, so I will stock up on on them and other hard to get stuff then.
I went last Christmas. Would’ve bought some if I knew about Koji before then! Bring lots of Koji starter back to Australia ok :)
I will bring back lots, but sorry to say, I won’t be in Australia, but returning to Sweden.
Vision Brewing supply Koji-kin. You can order online. They ship world wide.
http://www.visionbrewing.com
Thank you for the link! I’ll put it on my link page later
Thank you so much for the information, I have just made koji, it took one and a half days to get the bloom, though I think my rice was too wet to start with. The kitchen smelt like sake this morning. I hope to make miso tomorrow with the undried koji, as it will take too much energy to dry this stuff out. I hope it will work.Thanks again!
If it smells good it should be fine, but drier is better. Good Luck!
Thanks for this detailed post — it’s helpful for a newbie like me to visualize the process. I’m a Japanese transplant living in Ottawa, Canada, and am toying with the idea of trying to make my own miso here.
Not sure yet where to get my hands on the spores around here, though. I’m assuming I should be able to find some online, either from a Canadian business or someone from the U.S. A friend of mine from Tokyo has also offered to ship a dry package of koji kin to me – but I haven’t looked into the customs regulations yet to see if this would be stopped at the Canadian border or not.
Have you heard of anything about shipping koji kin across the border (from the U.S. or from Japan)?
Thanks for the feedback and questions! I don’t know anything about the regulations on sending koji starter over borders, except that there are some and they seem to be changing all the time. You’ll have to check with the authorities in Canada. I recommend getting it from Gem Cultures in Washington State, US, but I think they have a restrictive policy on overseas shipping. Them sending to Canada may be different. I have it sent to my brother who lives there and then I get it when I’m visiting. If you visit Japan you could get some.
Hey Yumi, I don’t know if you found any yet, but there’s koji here in Montreal, so there must be some in Ottawa, you just have to go to the right place. If you can’t find any, I’m sure a company from Montreal or Tpronto, would be willing to ship it to you.
Yumi, I am also from Ottawa, and I was also looking for koji. I called Miyamoto in Montreal, and the store does sell it. Maybe they would even be willing to ship it, too. Link to store:
http://www.sushilinks.com/miyamoto/
[…] returning to the koji making game, I read up on a couple of blogs to see where if I could get a clue where I was going wrong. I knew that potentially my problem was […]
Great post – thanks for taking the time……
Thanks!
Hej!
Thanks for stopping by my blog and liking my recent post. Welcome back anytime.
I’ve been wondering where you went.
Would a dehydrator substitute as a heat cabinet? Or do you have any recommendations for something makeshift?
I don’t know what kind of dehydrator you mean. The kind we have here wouldn’t work.
However, any encloser like a cardboard box with a heat source like a small light bulb should work if you can maintain a tempurature of about 30 degrees centigrade and a fairly high level of humidity for 2 days. Once my heat cabinet wasn’t working, and the koji turned out great anyway, but it took 5 days at 20 degrees.
So experiment and find out what works.
I have a box style dehydrator and actually set my tray on top of the dehydrator and place a box over my tray. If you opt to use the heat source from the dehydrator directly you have to maintain humidity. A proofer, like Brod&Taylor bread proofer well; as will your oven with the light on + the door barely open so you have air circulation, and a hot water bottle or two resting on the damp steamer cloth. You only need the hot water bottle until the ferment produces its own heat, even then you may not need the oven light, just depends.
Thanks again!
By the way, me too I ordered a few starters from this US company. I like most of them, except I will never purchase their natto starter again. It gives a very unpleasant smell (not like other nattos I’ve made or ate in my life.) My friend says the same, and we both have been eating natto since kids. Don’t know if their natto starter is your first try, if it scared you, please try other natto starter from other company, don’t be discouraged!
Thanks for reminding me of natto. I just now went to the fridge and took a teaspoon of natto I brought home from Uwajimayas in Seattle when we were there in March. It seems to last forever. Here too one could use old natto to inoculate a new batch. The main thing is to get the conditions right. I haven’t made any for so many years I don’t remember the details. Nowdays I always buy it. I am the only one who likes it and I need so little.
Hello!
Do you know how to make Tane koji (koji starter) ? from a small portion of tane koji that we purchased.
Tane koji can be made in several ways. The best is under laboratory conditions – sterile equipment and with the exact substrate. Traditionally it is made by letting koji grow to sporulation, then collecting the spore dust (tane koji) to use for later koji making. This may degenerate after a few generations. I always buy mine from reputable producers.
Bill Shurtleff in his Book of Miso has a couple of good descriptions for how to make tane koji.